Pruning. Let’s make a deal….

I had a lady that complained her apple trees were too old and needed to be cut down. “They don’t produce like they did years back.” I asked her when she had pruned them last and her answer was “never”. I made a deal that I would prune them for free if she would give me all the apples that I wanted…

I love to prune trees. It gets me out of the house in late winter and turns my thoughts to spring. Right now it is time to prune. Your trees may be picturesque, but they will be more productive if you give them a good pruning. (This lesson is for established trees only.)

Your objective is to give the fruit that will come in the spring some room. You need light and air movement through the central part of the tree.

Jim’s rules….

1. No tree is allowed to be over 20 feet tall. I will cut the central leader to twenty feet tall if there is a main trunk going up the center. If there is not a main trunk then prune the tree to an open shape in the middle.

2. No vertical limbs. There will be limbs that point straight up called watershoots. Cut them off.

3. No dead wood. Cut off all dead wood.

4. No two limbs shall touch. Limbs that criss-cross each other will just damage both. Prune one off.

5. No limbs may cross through the center off the tree. Prune them.

6. No downward drooping. Limbs that droop down will not get any light to the fruit. Prune them.

Back up and observe the tree from 40 feet. You have driven by an orchard and observed the neatness of the trees. Use that picture to give a finished look to the trees.

Save the pruned wood and toss it in the grill this summer. Fruit smoke is sweet to smell and will impart that sweetness on your food.

Oh, the lady that I pruned for? We filled the trunk of the car (Lincoln Continental) twice with apples and she begged us to come back for more. These came from five “unproductive” trees!

I will write more this year. Let me know your problem areas and I will try to help….

Posted in Uncategorized | Leave a comment

Low tech water delivery system

P1010504

I am no genius. Ask my sons, they will be more than happy to set the record straight. But, a few years back I invented a watering system that is fool proof. It never failed when I would use the hose to water something I would lay it down to ‘trickle’ at the base of a shrub, go off to do something else and forget it. Between Sonia and I, we had a few unintentional “overnight” watering sessions.

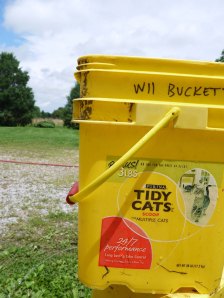
The solution was simple. I can’t believe that I had never seen it before. The Wii bucket. A bucket with a 1/8″ hole drill on the side near the bottom. The delivery is slow and really soaks the ground. I can add liquid fertilizer or soil acidifier and go to do other things without fear of over watering.

Why did I name it the Wii bucket? Two reasons. The bucket looks like it is.. well… relieving itself. The English call this a ‘wee’. (My sister is a transplant to Great Britain.) But in order to trick my video gaming son into doing a bit of outdoor chores I spelled it like the Nintendo gaming system! Hey, I already made it clear that I am no genius!

I get great exercise carrying buckets around the yard. You can carry as much or as little as you want. Or you can drag the hose and fill them directly.

Oh, and a shout out to R. Buckminster Fuller. (Our cat, not the designer!) He provides a new bucket for me every 5 or 6 weeks. Most cat owners will be glad to share a few empty cat litter buckets with you.

Try it out. It will save you time and money and it makes a great conversation starter with people walking by!

Posted in Uncategorized | Leave a comment

Fall projects.

Free hostas last week.  Now free seeds and turnips!

Our friend Diana hijaked seeds for the Red Hyancinth Bean!

One fun project in the fall is collecting seeds for next year.  Make sure that you have envelopes or small bottles saved to store them in.  Store in a cool dry place.  I put the containers in a plastic ice cream container and store in the attic.  Here are a few that we collect….                                                                        

I left two okra plants out with pods on them to completely dry.  The pods are brown and the shell is hard.  Cut the pods open.  The seeds are about the size of an english pea.  They will be black when completely dry.

We have a tomato that dad saved from a salad bar at the local steak house!  He liked the size and sweetness and decided he wanted to grow it.  We have raised these tomatoes for quite some time now.  He sliced it open and spread it on a newspaper.  After it dried out he put them in an envelope and marked it ‘Salad Tomato’.  We don’t know the variety, but have plenty of friends who come looking for plants in the spring.  Makes for a good trade!

We love the Red Hyacinth Bean.  This seed is easily collected,  easy to raise, climbs like crazy, has beautiful blooms, and beans.  I planted one next to a guide wire on an electric pole this summer.  Was trying to cover the wire to make it a little more pleasing to the eye.  It grew completely up the wire!  Easily 20 feet tall!  We let the pods dry COMPLETELY on the vine.  They will get brown and leathery,  but don’t fret.  Cut open the pod and take out the seeds.  They will be black with a white stripe and very hard.  If not, discard and wait another week or so before harvesting more pods.  These seeds have also become great traders for us too! 

Dad sold farm supplies and knows EVERY farmer in the surrounding 6 counties.  Some plant a patch of turnips on a field edge and invite others to pick.  Every fall dad and I take a trip to get turnips.  We get them home and wash them off with water.  We have an old ‘beer’ refridgerator in the garage and store the turnips in the crisper.  Mom covers them with a damp towel and just rewets it when it gets dry.  We have turnips until spring or as long as they last.  Mom makes the best slaw with them.  She shreds it with a grater and adds “any salad dressing you like”.  We eat turnip slaw every meal.

Posted in Okra, Red Hyacinth Bean, Seeds, Tomatoes, Turnips | Leave a comment

Time to plant the onions.

The sweet potatoes are cured and are going into storage in the basement.

Saturday we will plant our winter onions.  I wrote about this in the spring, but wanted to post a reminder to plant them.  Plant winter onions when the farmers plant their winter wheat.  I love the smell of tilled soil!  We will rake the row up a bit to keep them from sitting in any water, (they like moisture, but not wet ground)  and plant them about 6 inches apart and just two bulb widths deep then cover with straw.  Done! (for the winter).   


Posted in onions | Leave a comment

Free stuff….

Our new place in the country faces north. About 3 feet of that side of the house gets little sun. For me there is one solution, hostas!  There is a laundry list of reasons I like hostas. Low or no maintenance, variety, our hummingbirds love the blooms, and many others. But, the number one reason I love hostas may be cost. I have never purchased one. When moving them for my landscaping customers I can take a chunk off for transplant. (I always ask!). You see one in a friends garden that you like, just ask for a piece and most people will happily share with you.

Once transplanted, hosta plants require a good amount of water.  You will find the experts split on when to transplant  In general, it can be said that hostas can be transplanted anytime, when the soil is not frozen or too dry and hard.  I like the fall. (I am no expert).  I like the plants getting a chance to settle in during dormancy before spring growth begins.

The following are some tips and guidelines about transplanting hostas.  .

You must choose an ideal location that has to be prepared beforehand. You must also decide whether to plant them as such or to divide them before planting.  In order to prepare the location, you have to dig bigger holes (but with the same depth as the plant used to grow before), as per the root size of the plant. Add some compost to the soil. You may also add a small amount of slow release fertilizer. The location must provide them with at least 4 to 6 hours of shade with partial sunlight. Once you are done with the soil preparation, start digging out your hosta plant. In case, the plant is large, dig around the plant, so as to loosen the soil and use a shovel, to pop up the root clump. After taking out the root clump, separate individual plants with hands. In case of larger root clumps, you may use a serrated knife for splitting hosta plants roots. You may also remove the older leaves and dead roots. If the root clumps have large amounts of soil and dirt attached to them, tap the roots, so as to remove some. Don’t wash away the soil attached to the roots, but, you can soak the roots, by sprinkling a good amount of water. Water the plants regularly, till winter sets in.  Don’t allow the soil to get dry, during this period. Transplanting hostas is not that difficult, provided, you know the right methods. If done, properly, transplanted hosta plants are found to grow healthy and hearty.

Just don’t forget to share…..

Posted in Hostas | 1 Comment

What day is it?

Wow, October 12? Really? One crazy summer. Sonia had surgery (old volleyball injury), Dad got down in his back, I’ve been mowing three lawns…on and on it goes. (I did manage to fish a little too!)

Boy, did it get hot again. We poured the water on and kept things alive. It has truly paid off during September and into October. We have picked 2 bushels of tomatoes in the last week and a half. They show no sign of slowing until frost! Glad to have friends and family to share them with.

We tried a new watering system this year and had what we think were good results. Dad has always watered the same way, “Doesn’t matter if it’s you or the Lord, one inch a week”. This year we read that the inch of water should be done over two separate waterings. So, we watered 1/2″ every three days. If it rained an inch we waited four or five days before we put any more on. During the dry period of July and August, we didn’t get many ripe tomatoes, but the plants were strong and healthy. It was too hot for the fruit to ripen (tomatoes don’t set blooms or ripen when temps are over 95), but now we are reaping the benefits.

Our okra did stop when the days started to shorten. I pulled it all up, sans two plants that I left three pods apiece on for next year’s seed. I will leave them until thoroughly dry and then store them for next year’s planting.

My friend Kara sent loofa seeds to me and to be safe, I planted 25 or so in one hill and then thinned to eight plants. Those eight plants I let grow up on two 4 foot cages and they got so heavy, they pulled over the cages. I will have 40 or 50 loofas. Two different people have ‘harvested’ a loofa thinking they were zucchini that were getting too big. I need to ask Kara how long it would take to cook one down soft enough to eat! They will stay on the cages until they are completely brown, then I will peel and give to all the ladies in my life. Try them, the blooms are pretty and they were no work at all. This would make a good ‘kid’ plant. I will post pictures of my new loofa cage idea next year when we plant. (If you would like some loofa seeds, send me a SASE and I will send you some.)

I did some experimenting with snow peas and yellow squash and was pleased with both. We had early squash plants die due to borers or others insects long before we are tired of the fruit. So, I just replanted after pulling the old vines and they did fine. I planted new squash up to mid August and we are still harvesting. They are smallish, but still very tasty. August 1st I planted snow peas as an experimental fall crop and they have done great. They were slow to grow during the hot weather. They sprouted and grew to 10′ or so and just sat there. I didn’t think they would do much, but when it cooled off a bit they really took off. We consider it a bonus as we have never had a fall pea pods. I planted what I had (Oregon Giant II), but will check the catalogs for a variety that will do better in the fall.

Next year I will do better in helping you with your schedule. I am looking for the perfect calendar and plan on writing a schedule in January for the complete season. It will need adjusted as the summer goes on, but I think it will come in handy as the season rolls along.

For now, I want to catch a few more fish, and see if the Cardinals can get to the World Series…

Next time, Winter onions……

Posted in Gardening, Uncategorized | 1 Comment

It’s a what… onion?

So much going on in the garden at this time it’s hard to narrow down what to write about.  We are busy planting our snow peas .  Our rhubarb has ‘outgrown’ the straw that covers it. Strawberries are uncovered and starting to green up.  The asparagus watch is on!  You can go out every day and see huge changes in the garden.

One new plant for me this year is what dad calls the ‘potato onion’.  I have seen it called winter onion and pregnant onion also.  It’s an heirloom variety that is grown in a very different way than other onions.

Seems this onion propagates by adding small bulbs to the outside of the existing bulb.  They propagate the same way that my chives do in the herb garden.  I understand that shallots also reproduce this way. 

Last fall we started a new row in the garden just for our 2011 onion project.  I ordered bulbs from ‘The Southern Exposure Seed Exchange’.  They specialize in heirloom  seeds and plants.  I must tell you that if you are interested in starting up your own onion patch this way you better order now for fall delivery.  This line of onion was nearly lost and is hard to come by.  Dad had a few that we are using.  We also were lucky enough to have two other gardener friends who gave us some of their precious stock.

We raked the row up a bit to keep them from sitting in any water, (they like moisture, but not wet ground)  and planted them last fall about 6 inches apart and just two bulb widths deep and covered them with straw.  Done! (for the winter).

When the weather started warming in late February we pulled the straw back, loosened the soil, hit them with some balanced fertilizer, and covered them back up.  Now (late March) they are up about 6″.  Harvest will come when about 1/2 to 3/4 of the leaves are brown.  Grandma said ‘don’t let the July rain fall on them”.  We will see…

When we harvest there will be groups of bulbs similar to potatoes.  Curing must take place for the onions to be stored for any length of time. Cure onions by placing them in a warm, well-ventilated area until the necks are thoroughly dry. With warm temperatures, good air circulation and low humidity, curing should be completed within two weeks after harvest. Onions are best stored in a cool, moderately dry area in ventilated containers.

I like a red onion when I need a hotter flavor, but I am looking forward to this delicate and sweet onion.  If we are successful with this project we won’t have to buy onion bulbs for our main crop again.

Posted in Uncategorized | Leave a comment

That’s it…Bring on spring

Finished for the year.  Or so I thought…

We had our first deep freeze this last week, so it was time to finish the garden for the year.  I like to let the asparagus freeze before cutting it down at ground level.  Then, it needs a light covering of straw. 

I covered the strawberries with straw and that is that.  Nothing HAS to be done until the weather starts to turn in the spring…but I have a few winter projects planned to keep me busy and out of Sonia’s hair.

I am going to install a sprinkler on top of a seven foot pole to keep from having to move it when not in use.  I bought an adjustable sprinkler to ‘fit’ to my garden size. It will be above the plants and should allow me to water the entire garden at once.  The sprinkler will have a mechanical timer on the spigot.  I plan on turning it on at or near sun up and have no worries about forgetting to turn it off.  I am notorious about forgetting and have made a muddy mess more than once!

My last blog I mentioned that I was going to taste my rhubarb wine.  Well, I am sorry to say that it went down the drain.  It was not good at all.  I will not give up and will try more next spring.  On a better note, my dad is ‘keeping his toes warm’ with the batch of blackberry that I bottled this fall.

Now that the garden is put to bed for the winter, I can sit back, sip a glass of wine, watch the snow fly and dream of the all the wonderful things the garden will produce next summer. Merry Christmas everyone!

Posted in Strawberries, Winterizing your garden | 1 Comment

It’s November, what do I do?

There is always something to do in or around the garden, no matter the season.  Or, as mom says, “no rest for the wicked”. Here is a list of helpful hints to prep your garden for next spring.

Tie up canes from roses, blackberries, raspberries, etc., to keep them off the ground. Tie them with twine using big, loose loops to prevent it from cutting into the canes.

I just finished tilling my garden. Remember the straw we put down after planting? Just till it into the soil. It will help keep the soil loose and it will decompose to enrich it also.

Don’t be in a rush to complete some chores. Strawberries need to be exposed to a 20 degree day before being covered with straw. Asparagus needs a deep freeze also before cutting it to the ground and mulching it.

Tomato, pepper, and other cages should be stacked neatly and any repairs needed should be done now, so they don’t slow you down come springtime. Change the oil in the mower and tiller.  Sharpen blades, tines, shovels, pruners and trimmers.  Put a little penetrating oil on them to prevent rust.  Drain your garden hoses and store inside.

Check through your seeds and discard the old.  Did you save okra pods, hyacinth beans or others for seed?  Label them now and store them to prevent confusion  in the spring.

Don’t throw away the small pots that you bought plants in this year.  Our local Master Gardeners club has a plant sale in the spring.  Many members start plants for the sale and could probably use your extra pots. I buy seed and take it along with my extra pots to my friend in the club.  He starts the plants and gives me the few that I need.  I let him keep all the pots and seedlings that I don’t need and they go into the sale. 

We planted our winter onions this week also.  It’s probably too late to order them now, but put them on your list for next fall. Spring onions are great and I will try to write a blog on them soon.

Well, my rhubarb wine needs bottling (and tasting), so until next time, happy gardening!

Posted in Gardening, Gardening tool care, Winterizing your garden | Leave a comment

ooooh boys, it’s hot!

There are a lot of things that happen in the garden that we can control, and many more that we can’t.  Today let’s talk about one of each.

I can control an insect that is giving my eggplant fits.  I noticed that the plants were yellowing and upon closer inspection found small holes in the leaves.  Flea beetles love the eggplant leaves.   A little Sevin dust and they will be taken care of.  As always follow the instructions on the label.  I try to be as green as possible, but will use pesticides when necessary.

Now what I can’t control is the weather.  My tomatoes are loaded with fruit, but I don’t think they are ripening like they should.  I still have not picked one in my urban garden.  Dad and I use the same practices in our gardens and his tomatoes are starting to turn on.  We will be canning soon.  My brother’s are also picking up the pace.  I look next door to my neighbor’s plants and see her plants loaded, but not ripening.  Okay, time to go to the web and do some research.

When daytime temperatures rise above 95 degrees or nightime temps don’t fall below 75 degrees tomatoes will cease to ripen, cease blossoming, and abort blossoms.  These temps are very close to what our weather pattern has been the last three weeks.  Knowing this I would venture that the city is just too darn hot.  My brother and my dad are getting tomatoes to ripen (though not as much as we think they should).  Dad lives in a rural setting and my brother on the edge of a small town.  In the city the nighttime lows don’t fall like they do in the country.  That’s my best guess.  If anyone has a different theory I would love to hear it.  I will be watching this pattern to see what happens when the weather changes. 

I am not a fan of fried green tomatoes, but we do make some pretty good relish with them.  So we wait until the weather breaks.

I will be patient, I will be patient, I will be patient……

Posted in Uncategorized | Leave a comment